官方的举例?
wx.canvasToTempFilePath({
  x: 100,
  y: 200,
  width: 50,
  height: 50,
  destWidth: 100,
  destHeight: 100,
  canvasId: 'myCanvas',
  success(res) {
    console.log(res.tempFilePath)
  }
})
我的实例?
  getCanvas(path) {
    var that = this
    wx.getSystemInfo({
      success: function (res) {
        var pixelRatio = res.pixelRatio;
        var width = res.windowWidth
        var height = res.windowHeight
        var gap = 40 //图片边框
        that.setData({
          width: width,
          height: height,
          gap: gap,
          pixelRatio: pixelRatio,
        })
        wx.getImageInfo({
          src: that.path,
          success: function (res) {
            that.canvas = wx.createCanvasContext("image-canvas", that)
            that.canvas.drawImage(that.path, 0, 0, that.data.width, that.data.height)

            wx.showLoading({
              title: '数据处理中',
              mask: true
            })
            that.canvas.setStrokeStyle('fff')
            // 这里有一些很神奇的操作,总结就是MD拍出来的照片规格居然不是统一的
            //过渡页面中,对裁剪框的设定
            that.canvas.draw()
            setTimeout(function () {
              wx.canvasToTempFilePath({ //裁剪对参数
                canvasId: "image-canvas",
                x: that.data.gap, //画布x轴起点
                y: that.data.gap, //画布y轴起点
                width: that.data.width - 2 * that.data.gap, //画布宽度
                height: 500, //画布高度
                destWidth: that.data.width , //输出图片宽度
                destHeight: 500   , //输出图片高度
                canvasId: 'image-canvas',
                success: function (res) {
                  that.filePath = res.tempFilePath
                  // 清除画布上在该矩形区域内的内容。
                  that.canvas.clearRect(0, 0, that.data.width, that.data.height)
                  that.canvas.drawImage(that.filePath, that.data.gap, that.data.gap, that.data.width - that.data.gap * 2, 500)
                  that.canvas.draw()
                  wx.hideLoading()
                  // 在此可进行网络请求

                },
                fail: function (e) {
                  wx.hideLoading()
                  wx.showToast({
                    title: '出错啦...',
                    icon: 'loading'
                  })
                }
              });
            }, 1000);
          }
        })
出现的问题:图片模糊,画质像被压缩了一样
翻翻文档,发现了下面这个细节
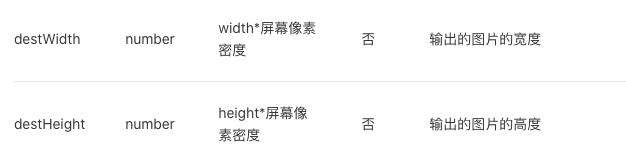
解决办法:本质上就是生成一个更大的图片,因为手机的屏幕设备的像素比现在一般都是超过2的。实际上我们只需要在使用wx.canvasToTempFilePath的时候,设置参数destWidth和destHeight(输出的宽度和高度)为width和height的2倍以上即可。
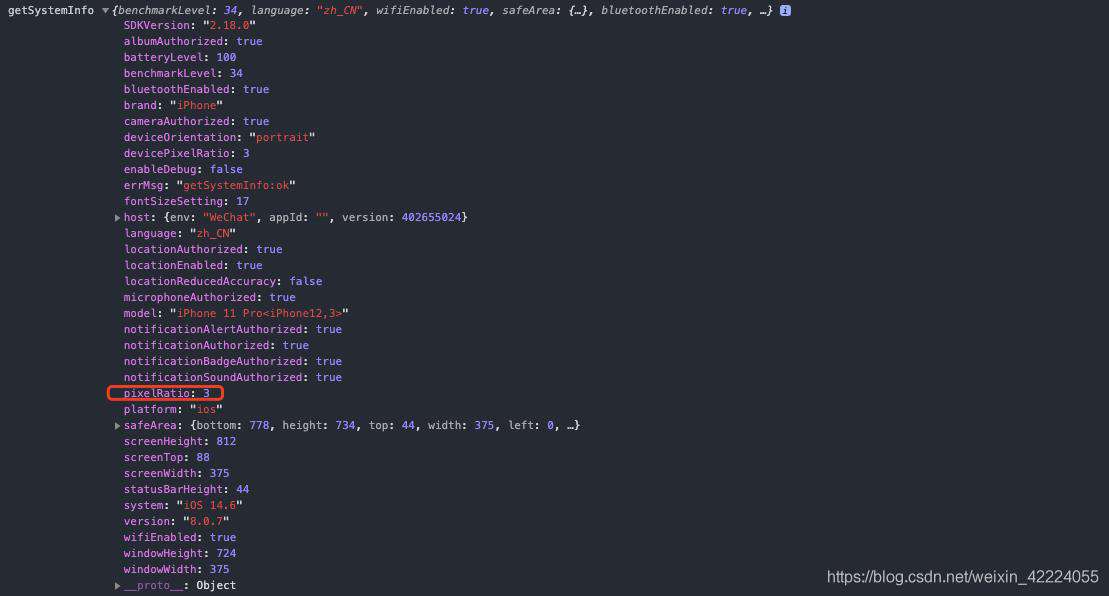 通过wx.getSystemInfo()获取设备像素比为3
所以在图片导出的时候,需要设置
destWidth:width * pixelRatio // width*3
destHeight:height * pixelRatio // height*3
修改完后,导出的图片就和拍摄时的图片清晰度保持一致啦
常见问题FAQ
- 免费下载或者VIP会员专享资源能否直接商用?
- 本站所有资源版权均属于原作者所有,这里所提供资源均只能用于参考学习用,请勿直接商用。若由于商用引起版权纠纷,一切责任均由使用者承担。更多说明请参考 VIP介绍。
- 提示下载完但解压或打开不了?
- 找不到素材资源介绍文章里的示例图片?
- 模板不会安装或需要功能定制以及二次开发?


发表评论
还没有评论,快来抢沙发吧!