路由知识
Vue-router是Vue全家桶的重要组成部分,是使用vue框架的FEer们经常要打交道的。学习理解Vue-router的实现原理,可以帮助我们在项目中更好的运用,在遇到问题是更准确的分析问题。
想了解Vue-router,我们要先了解路由的演变过程。路由这个概念最早出现在后端,随着技术的发展逐渐演化出前端路由。所以这里先从后端路由开始说起。
后端路由
早期使用模板引擎开发页面的时候经常会看到这样的路径:
http://example.xxx.cn/bbs/forum.php
这种有带.php或.asp 或.html 的路径就是所谓的服务端渲染SSR(Server Side Render)。前端页面在服务端渲染完成后返回给浏览器。当然后端路由不光指返回html等资源,它还需要针对请求接口进行处理,返回接口对应的数据。比如访问http://example.cn/pageA 服务器就返回pageA渲染完成后的html资源,访问http://example.cn/api/getData 服务器就返回/api/getData接口的数据。 通常服务端会对路由进行分层,根据不同的url走不同的中间件,返回不同的内容。控制页面跳转只是后端路由功能的一小部分。

ok,从上面?我们可知后端完全可以实现路由的跳转,那么为什么现在都进化成前端路由来控制呢?因为后端路由有一定的缺陷:
- 路由的跳转作为请求打到服务器上,增加服务器端的负荷。
- 每次切换页面都要重新加载html资源,影响用户体验。
前端路由
因为后端路由的种种缺陷,工程师??便开始思考,能不能靠前端控制页面跳转呢?如果想通过前端实现路由的功能,得解决两个问题:
- 在页面不刷新的前提下实现 url 变化
- 浏览器提供api能监控到 url 的变化,以便执行页面重渲染的逻辑
而现有的浏览器也支持两种方式:hsah和historyApi 来解决上问题。
hash
-
url的hash类似上面这种?,# 后面的hash变化不会向服务器发请求,也就不会刷新页面。
http://example.cn/#/pageA -
浏览器提供
hashchange事件监控hash的变化window.addEventListener('hashchange', function(){ // hash变化触发此事件 })
historyApi
html5中提供了3个关于url的api: pushState , replaceState和popstate。
-
通过pushState和 replaceState改变 url 地址且不会发送请求。
-
通过popstate监听url中的pathname变化。
window.addEventListener('popstate', function(){
  // location.pathname变化触发此事件
})
综上我们可知,前端路由的实现可以依靠hash或者historyApi。
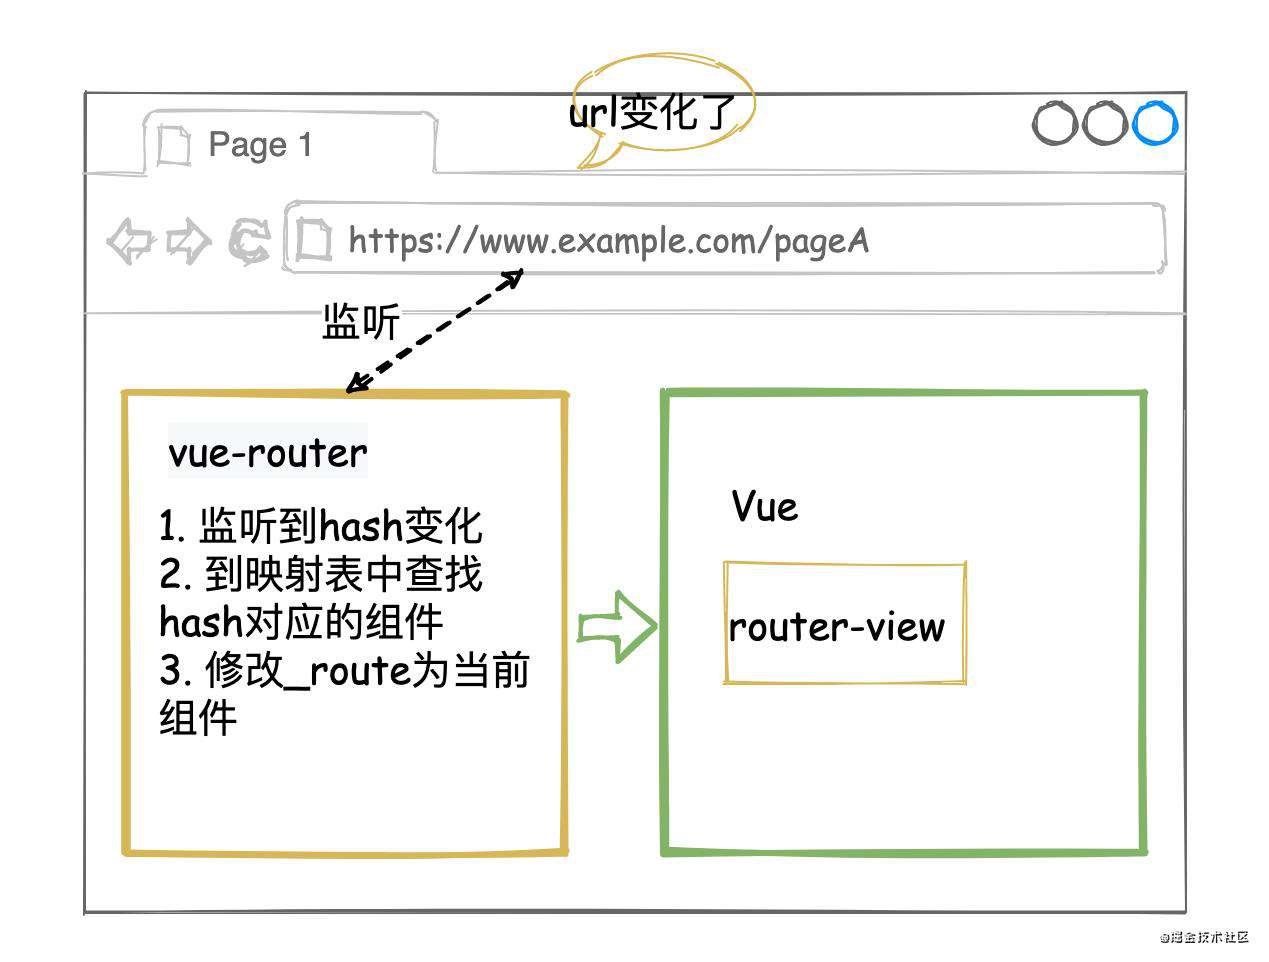
查阅Vue-router官网可知,他有两种模式,hash模式和history模式,分别是基于hash和historyApi实现的。其响应过程是这样的:
- Vue-router 监听url中的hash或pathname变化
- 发现hash或pathname改变后,在路由映射表中查找对应的组件
- 修改_route为变化后的组件
- 由于_route是Vue的响应式数据,它发生变化会触发vue更新视图
- 组件重新渲染,拿_route对应的组件渲染页面
为了更好的理解vue-router的实现原理,此处我会手把手带大家实现一个简版的vue-router。
简版实现
分析vue-router用法
下面用伪代码来写vue-router的用法,主要有5步:
// 1. 引入vue-router
import VueRouter from 'vue-router'
// 2. Vue.use插件
Vue.use(VueRouter)
// 3. 配置路由映射表
const routes = [
  ...
]
 //4. 生成router实例
const router = new VueRouter({
  mode: 'history',
  routes, // (缩写) 相当于 routes: routes
})
// 5. Vue挂载router路由实例
new Vue({
  render: (h) => h(App),
  router,
}).$mount('#app')
-
分析可知vue-router能new,那么肯定是个类。
-
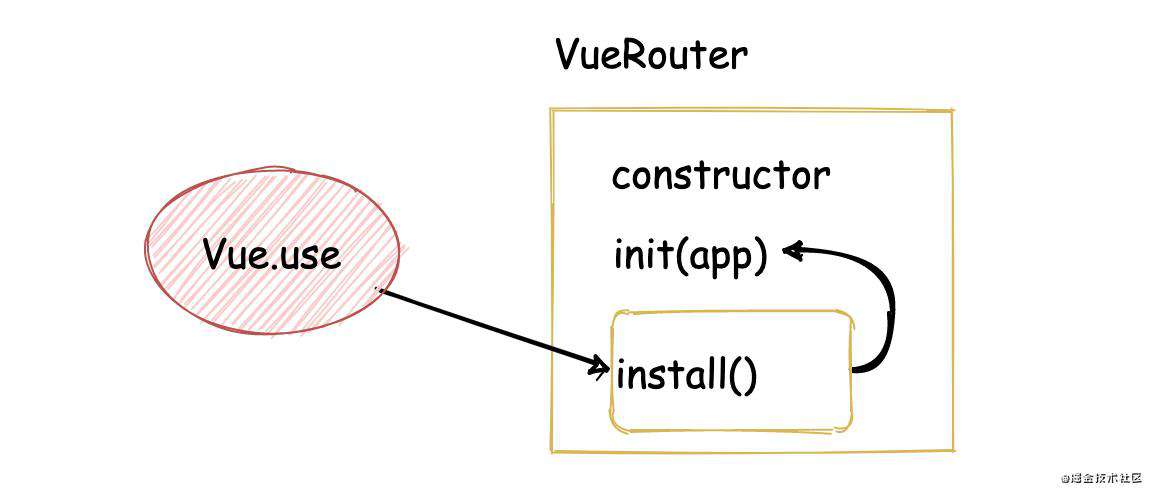
vue-router是插件,需要调用Vue.use。再看下Vue.use的源码?,它主要是调用插件上的install方法,或者调用插件函数本身。当然vue-router是个类,那么无法直接调用,所以vue-router上面得实现个install方法。
import { toArray } from '../util/index'

export function initUse (Vue: GlobalAPI) {
  Vue.use = function (plugin: Function | Object) {
    const installedPlugins = (this._installedPlugins || (this._installedPlugins = []))
    if (installedPlugins.indexOf(plugin) > -1) {
      return this
    }

    // additional parameters
    const args = toArray(arguments, 1)
    args.unshift(this)
    if (typeof plugin.install === 'function') {
      plugin.install.apply(plugin, args)
    } else if (typeof plugin === 'function') {
      plugin.apply(null, args)
    }
    installedPlugins.push(plugin)
    return this
  }
}
总结一下:1. vue-router是个类 2. 这个类上有install方法。接下来我们分别来实现他们,为了代码的易读性,我在一个文件里编写,核心逻辑和变量名都和源码保持一致。
实现install方法
先在router目录下创建一个文件index.js ,把router配置文件中的vue-router的引用指向本地编写的router/index.js文件。
初始化代码如下:
class VueRouter{}
VueRouter.install = function(){
}
install方法主要这几个功能:
-
传入Vue。这里插一句,Vue中为了保证插件和业务代码中引入的Vue是同一个,会往install中传入Vue。Vue-router把Vue保存下来内部都使用这个传入的Vue。
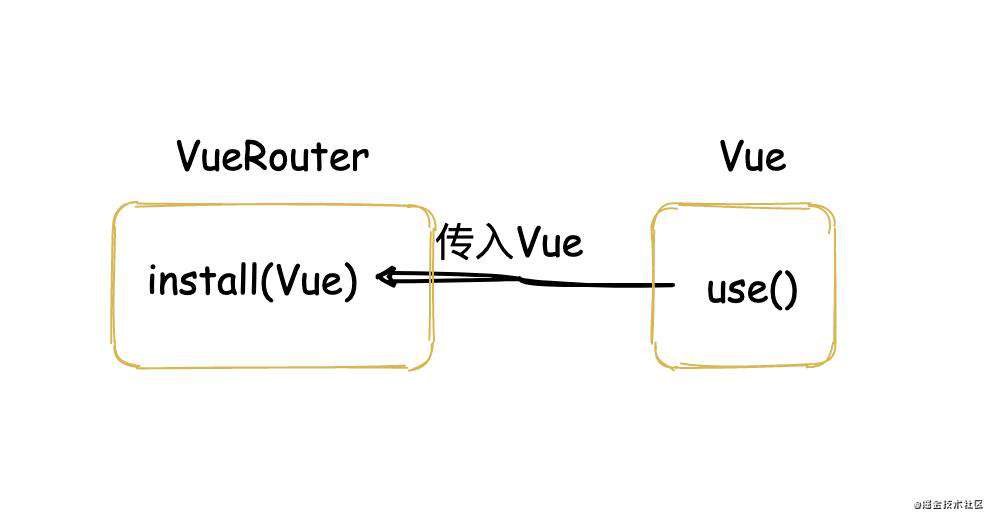
let Vue VueRouter.install = function(_Vue) { Vue = _Vue } -
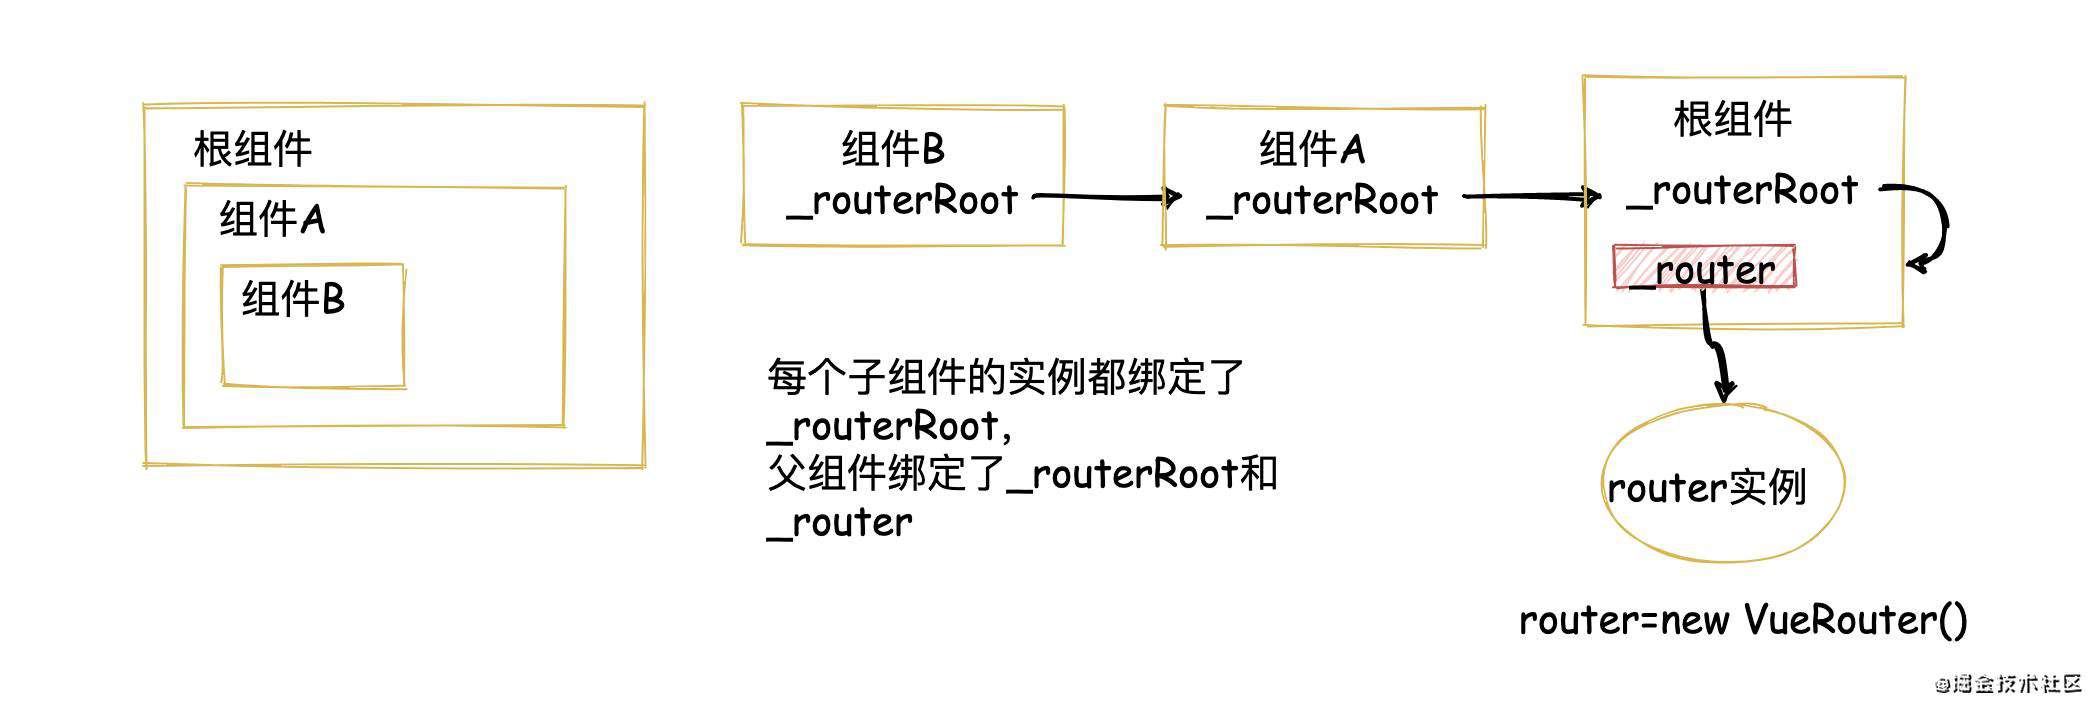
调Vue.mixin,在beforeCreate钩子里给每个组件添加
_routerRoot,给根组件添加_routerRoot和_router。这步骤的目的是让每个子组件都能通过调this._routerRoot._router获取router实例。
Vue.mixin({
beforeCreate() {
if (this.$options.router) {
// 根组件
this._router = this.$options.router
this._routerRoot = this
this._router.init(this)
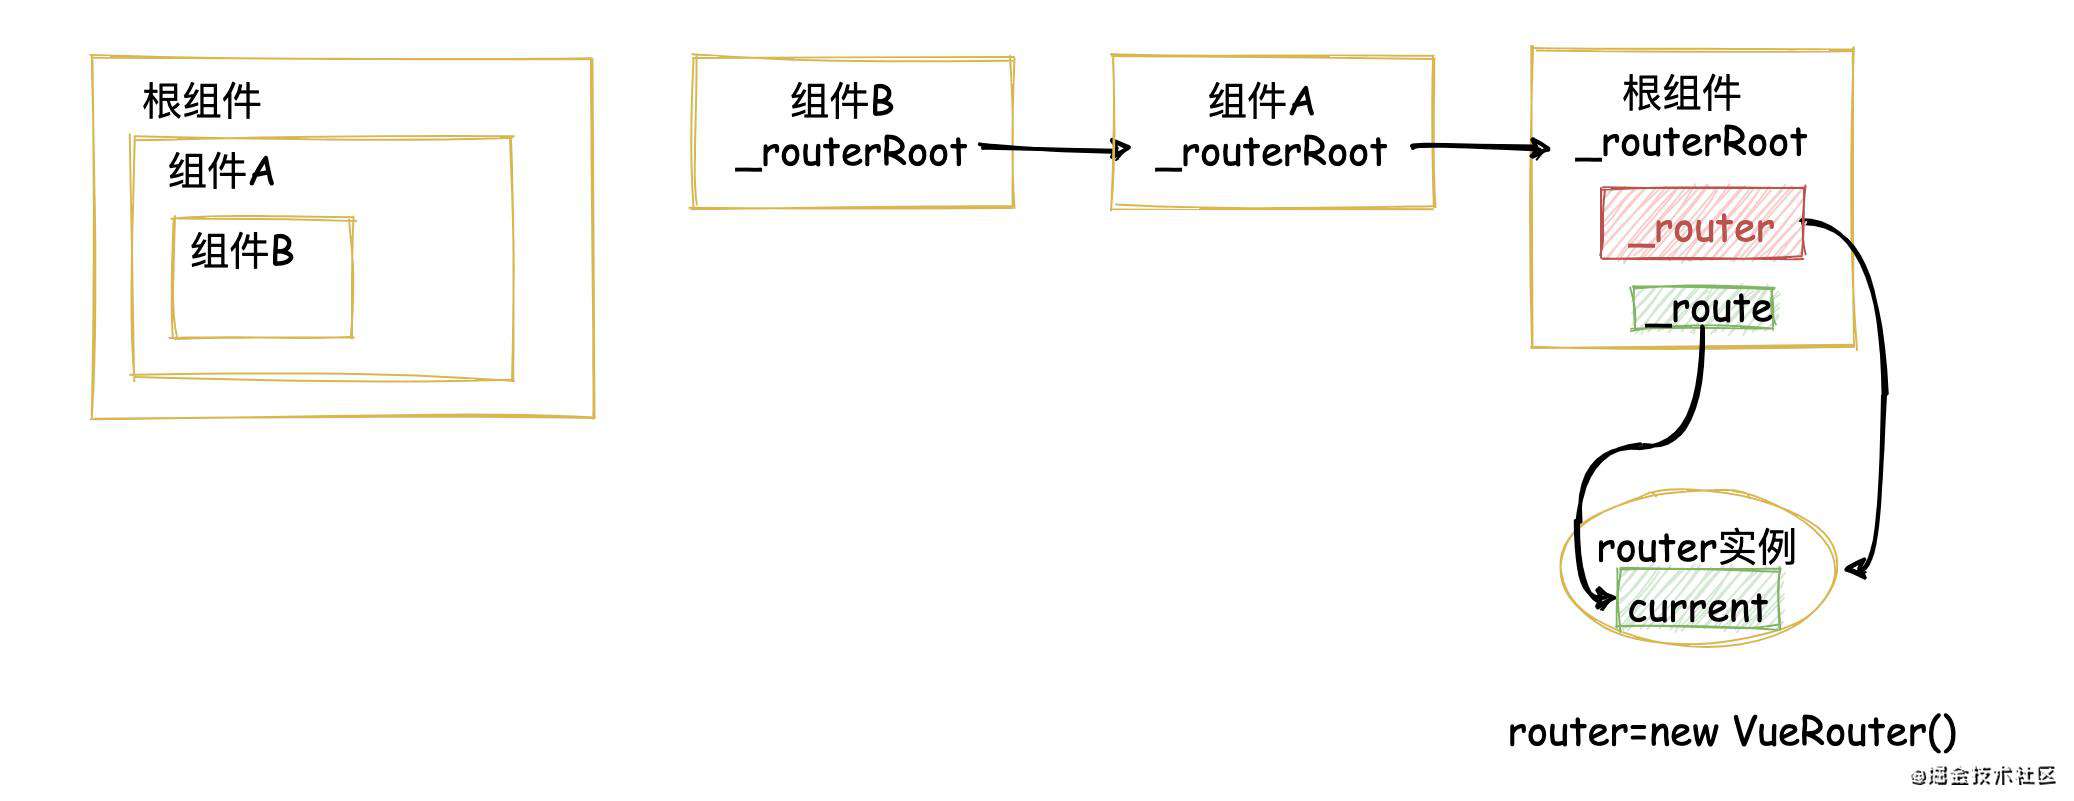
Vue.util.defineReactive(this, '_route', this._router.current, () => {})
} else {
// 子组件
this._routerRoot = this.$parent ? this.$parent._routerRoot : null
}
},
})
代码中通过this.$options.router区分根组件还是子组件。如果当前组件是根组件,调用VueRouter类上的init方法。 init方法是vue-router的入口文件,此处先挖个坑,在后面讲解class VueRouter中init方法实现的功能。
this._router.init(this)
还调用Vue.util.defineReactive,给Vue实例增加_route属性,值是router实例上的current属性。此处再说明下:
- Vue.util.defineReactive是Vue提供的方法,能够把
_route变成响应式,vue-router实现url变化触发视图重新渲染全靠它了。想深入了解Vue.util.defineReactive的实现,需要掌握vue的响应式原理,此处我就不深入讲解,下篇文章再扒~ 此处我们只需要知道Vue实例上多了个属性_route它的值和router实例上的current一样,current内包含当前url对应的组件。
Vue.util.defineReactive(this, '_route', this._router.current, () => {})
- 定义全局组件
router-view和router-link。
- 其中router-link的实现主要是给a标签增加一个click事件,触发时跳转到对应的路径上。其中
this.$slots.default实际上是获取a标签内部的chIldren,这和react中的{...props.children}意思差不多。
Vue.component('router-link', {
    props: {
      to: {
        require: true,
        type: String,
      },
    },
    render() {
      let click = () => {
        this.$router.push(this.to)
      }
      return <a onClick={click}>{this.$slots.default}</a>
    },
  })
- router-view本质上是拿vue实例上的_route获取当前url对应的组件,并渲染到页面上。此处的实现需要了解_route的数据结构,我放到后面来讲。
-
给Vue.prototype新增两个属性
$route和$router,这样每个组件内部都能够从router实例上获取_router和_route。也就是说在每个组件内调用this.router,本质上是因为通过‘routerRoot‘查找最终找到根组件上的_router,最终找到router实例上了。同样,this.route则会通过_routerRoot最终找到根组件上的_route。Object.defineProperty(Vue.prototype, '$route', { get() { return this._routerRoot._route }, }) Object.defineProperty(Vue.prototype, '$router', { get() { return this._routerRoot._router }, })

VueRouter.install的完整代码太长了,我就不贴出来了,点击代码仓库查看吧?实现代码:阅读VueRouter.install部分
实现VueRouter类
constructor的实现
new VueRouter时实际上调用的是VueRouter的constructor方法。
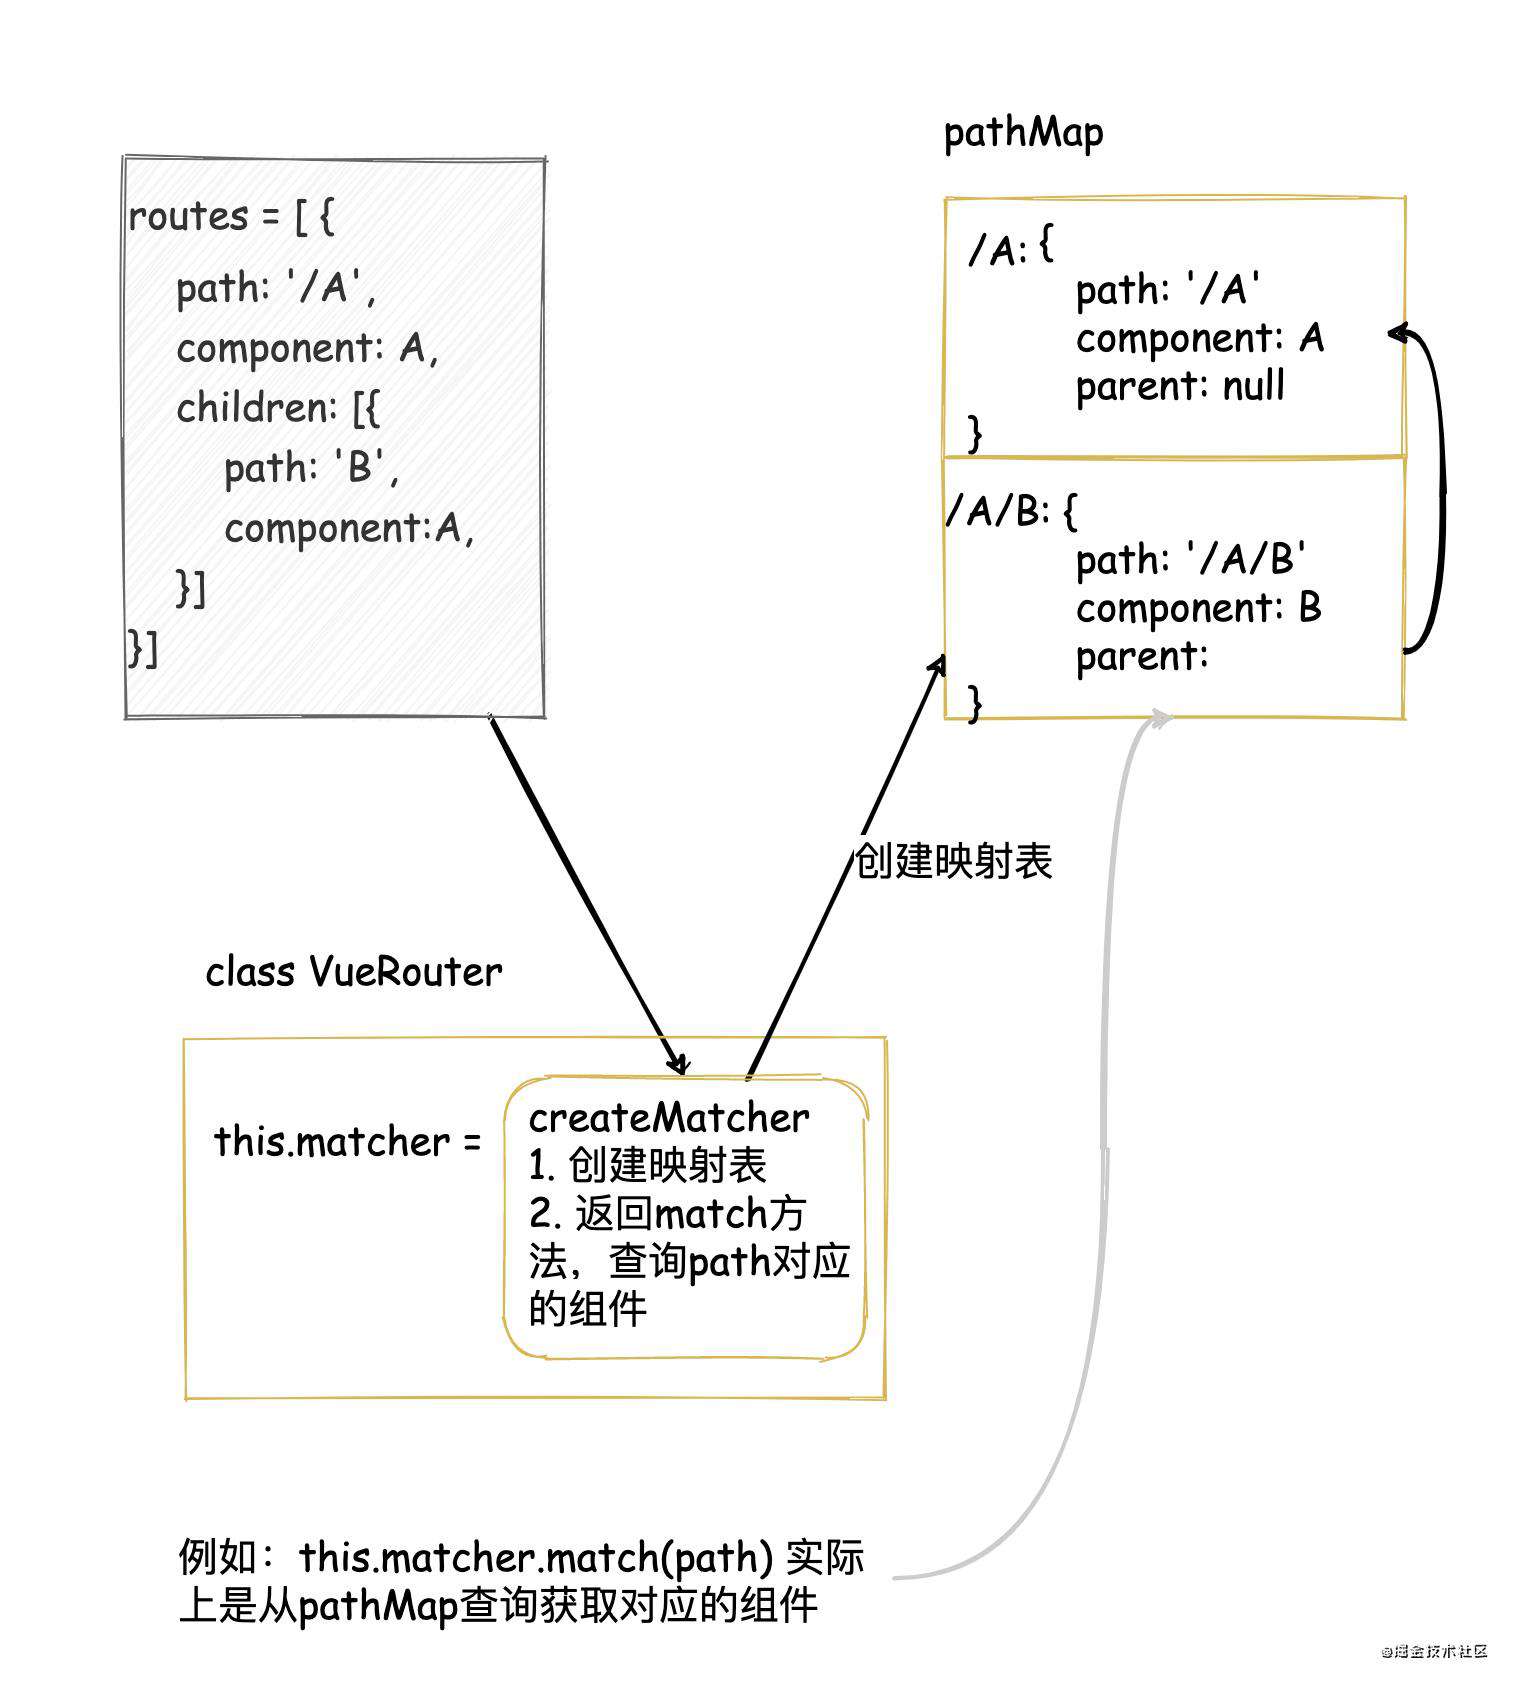
- 调用createMatcher方法,将routes从数组形式转化对象形式的pathMap,方便后期匹配到path对应的组件。
this.matcher = createMatcher(options.routes)
createMatcher会创建一个新的对象pathMap,其中key是path,值是一个对象,内部有path,component,parent等属性。此外它还返回一个match方法,来匹配当前path对应的组件并返回。后期要查询当前path对应的组件,直接调用this.matcher.match(path)就行了。
let pathMap = {}
function createMatcher(routes, parent = null) {
  routes.forEach((route) => {
    let path = parent ? `${parent.path}/${route.path}` : route.path
    pathMap[path] = {
      path,
      component: route.component,
      parent,
    }
    if (route.children) {
      createMatcher(route.children, route)
    }
  })

  function match(path) {
    return pathMap[path]
  }
  return { match }
}
-
pathMap中获取到的数据还需要进一步的转化,因为pathMap值提供当前组件,实际上还需要递归获得父组件,祖父组件等,从而获得所有需要重新渲染的组件。createRoute就是提供这个方法,将pathMap中的组件重新组装成类似
{path: '/A/B', matched:['A','B']}的形式,mathed就是对应收集到的所有需要重新渲染到的组件。调用createRoute传入的初始值是
/,null。最后转化好的当前组件返回给this.current保存。this.current = createRoute(null, { path: '/' })

function createRoute(record, location) {
  let matched = []
  if (record) {
    while (record) {
      matched.unshift(record)
      record = record.parent
    }
  }

  return {
    ...location,
    matched,
  }
}
-
创建hooks数组,用来存放当调用router.beforeEach等钩子时传入的callback函数。
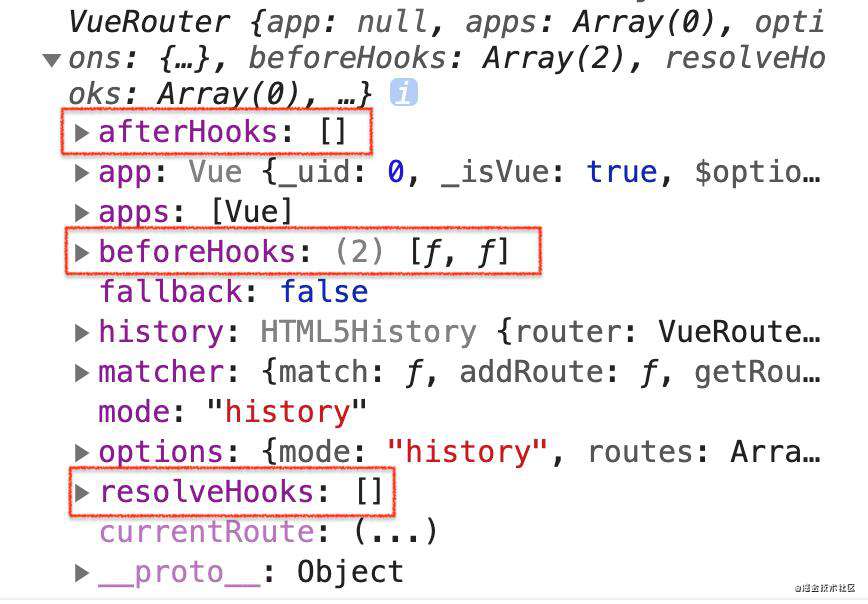
-
说明:在router.js的配置文件中,我们可以打印出
vue-router的实例,此处能看到vue-router实际挂载了afterHooks,beforeHooks和resolveHooks,分别来存放beforeEach,beforeResolve,afterEach等钩子,此处为了简化我直接用hooks来代替了。
-
this.hooks = []
小结一下,new VueRouter之后会在实例上有:
- this.matcher:
- 重新组装routes配置文件,生成url-component映射表:pathMap
- 提供this.matcher.match方法,获得url对应的组件
- this.current 内包含当前url需要渲染的所有组件,数据结构为
{path: '/A/B', matched:['A','B']} - this.hooks用来保存
beforeEach,afterEach等钩子函数的回调

init方法
在上面的介绍中我们知道Vue.use(VueRouter)时,本质是调用VueRouter.install方法。install方法里又调用了this._router.init(this),也就是VueRouter实例上的init方法,并且传入了this(即vue根组件的实例)
init(app) {
  	this.cb = (route) => {
      // current变化,给_route赋值
      app._route = route
    }
    this.transtionTo(getCurrentLocation(), this.setupListener)
  }
先分析this.cb这句,它是给实例添加cb方法,通过调用此方法能改变app上的_router,而app正是vue实例啊。还记得之前那张图吗?? 也就是说调用this.cb就能修改vue实例上的_router从而触发视图重新渲染。
this.cb = (route) => {
  // current变化,给_route赋值
  app._route = route
}

再看下transtionTo方法,先看入参:
- getCurrentLocation: 其实是获取当前的hash
function getCurrentLocation() {
  return location.hash.slice(1)
}
- this.setupListener: 监听hashchange事件,hash变化则再次调用transtionTo
setupListener() {
    window.addEventListener('hashchange', () => {
      this.transtionTo(getCurrentLocation())
    })
  }
- transtionTo的实现:
transtionTo(path, cb) {
    let record = this.matcher.match(path) //匹配到后
    let route = createRoute(record, { path })

    if (this.current.path == path && START !== this.current) {
      return
    }
    this.cb && this.cb(route)
    this.current = route
  	cb && cb.call(this)
  }
-
获取当前的path
-
从pathMap中获取path匹配的路由组件record。
-
调用createRoute将record转化成route。还记得上面讲的createRoute的实现吗?createRoute将pathMap中的组件重新组装成类似
{path: '/A/B', matched:['A','B']}的形式,mathed就是对应收集到的所有需要重新渲染到的组件。此处将createRoute()的结果赋值给route最终给this.current。这样,我们获取到了当前url以及需要更新的组件。

-
调用this.cb,修改app._route,这会触发vue重新render
-
修改VueRouter实例上的current
-
调cb回调,即调this.setupListener给window绑定监听hashchange事件

router-view的实现
此时回到之前没讲完的router-view的实现。router-view实际上是一个全局组件,根据url的不同,挂载当前url对应的组件。因为router-view内部不需要维护状态(没有用到data),所以用函数式组件来实现。
说明一下:
- 从parent.$route获取当前url对应的组件,格式为
{url: '/A/B', matched:[A,B]} - 组件内部挂载属性data.routerView作为当前组件是的标识,再递归父级组件,计算出当前的depth,在从matched数组中获取当前组件。
Vue.component('router-view', {
    functional: true,
    render(h, { data, parent }) {
      let route = parent.$route
      let depth = 0
      while (parent) {
        if (parent.$vnode && parent.$vnode.data.routerView) {
          depth++
        }
        parent = parent.$parent
      }
      let record = route.matched[depth]
      data.routerView = true
      if (!record) {
        return h()
      }
      // route.matched[depth].route.component
      return h(record.component, data)
    },
  })
钩子函数的实现
-
钩子函数的收集
当我们调用
router.beforeEach()等钩子函数时,实际上是把回调函数传入到this.hooks中保存起来。在类VueRouter上添加beforeEach方法
beforeEach(hook) { this.hooks.push(hook) } -
钩子函数的执行
当url改变,会触发transtionTo方法,修改app._route从而更新页面。我们需要在修改app._route之前执行钩子函数。
将transitionTo函数改造一下:
transtionTo(path, cb) {
    let record = this.matcher.match(path) //匹配到后
    let route = createRoute(record, { path })
    // 两次跳转路径一致,不跳转, 比对长度防止第一次跳转不走cb
    if (path === this.current.path && START !== this.current) {
      return
    }
    // 把current变成响应式,后期更改current更新视图
    const iterator = (hook, next) => {
      hook(this.current, route, () => {
        next()
      })
    }
    function runQueue(queue, iterator, cb) {
      // 异步迭代
      function step(index) {
        // 可以实现中间件逻辑
        if (index >= queue.length) return cb()
        let hook = queue[index] // 先执行第一个 将第二个hook执行的逻辑当做参数传入
        iterator(hook, () => step(index + 1))
      }
      step(0)
    }

    runQueue(this.hooks, iterator, () => {
      this.updateRoute(route)
      cb && cb.apply(this)
    })
  }
回顾下整体流程:

完整的vue-router简版代码?:vue-router.mini.js
源码解析
上面我们实现了一个简化版的vue-router,实际上vue-router的实现当然是充分的考虑到代码的解耦、封装、复用,把各个函数拆分到不同的文件中。
Vue-router面试题
最后来几道Vue-router的面试题巩固下吧~
1. vue.use 的原理
Vue.use的简版实现如下:
Vue.use = function(plugin, options){
	plugin.install(Vue, options)
}
Vue.use本质上就是调用插件的install方法,并往里传入Vue给插件内部使用。这样能确保插件内使用的vue和外部使用的vue版本一致。
**补充:**此处和react的实现有所不同,react为了实现插件和项目代码使用同一个react库文件,采用了peerDependencies。
2. history模式和hash模式的区别
hash模式: url地址栏中#加上后面的部分。
-
获取:
location.hash -
监听hash变化的api:高版本浏览器用popstate,低版本浏览器用hashchange
-
改变#不会发送请求到服务器,不会触发网页重载。# 只是用来标示网页位置,以下两种方式可以设定网页指定位置。
<a name="print"></a> //1. 设置hash <div id="print"></div> //2. 设置id -
hash不是http的一部分,不会打到服务端
-
改变#会改变浏览器的访问历史
history模式: url中没有#
- 获取:
location.pathname - 监听变化的api:popstate
- 在地址栏敲回车,如果是history模式,会发请求到服务器。因为这本质是一个get请求。服务器需要做处理,常见处理是从url中区分出是page请求,直接返回html。
- 如果是点击页面按钮产生的路径切换,组件会重新渲染。
3. $router 和 $route的区别是什么?
$router放的是方法,$route放的是属性
4. vue-router 如何保证每个子组件获得router上的方法?
-
Vue.mixin方法,在beforeCreate中给每个子组件添加
_routerRoot指向其父组件,给根组件添加_routerRoot指向自身,给根组件添加_router指向router实例。每个子组件调this._routerRoot能找到根组件。每个子组件调this._routerRoot._router能够找到根组件上的_router,从而找到router实例。 -
使用
Object.defineProperty给Vue.prototype添加$router 属性,指向this._routerRoot._router,从而在子组件中能够通过this.$router获取到vuerouter的实例。

5. 路由的核心原理:(映射表)
- 将路由的配置扁平化,能够找到当前url对应组件以及所有父组件。
- 使用Vue.util.defineReactive把vue实例上的_route属性变成响应式。
- 监听url的变化,使用popstate(history模式或高版本浏览器的hash模式)或者hashchange(低版本浏览器的hash模式),url变化则更改vue实例上的_route,触发页面重新渲染。
监听当前路径 ➡️ 路径改变 ➡️ 找到新路径对应的组件 ➡️ 渲染组件
常见问题FAQ
- 免费下载或者VIP会员专享资源能否直接商用?
- 本站所有资源版权均属于原作者所有,这里所提供资源均只能用于参考学习用,请勿直接商用。若由于商用引起版权纠纷,一切责任均由使用者承担。更多说明请参考 VIP介绍。
- 提示下载完但解压或打开不了?
- 找不到素材资源介绍文章里的示例图片?
- 模板不会安装或需要功能定制以及二次开发?


发表评论
还没有评论,快来抢沙发吧!