简单的实现vue3的响应式
简单的模拟vue3
index.html
<!DOCTYPE html>
<html lang="en">
  <head>
    <meta charset="UTF-8" />
    <meta name="viewport" content="width=device-width, initial-scale=1.0" />
    <title>Document</title>
  </head>
  <body>
    <div id="app"></div>
  </body>
  <script type="module" src="./index.js"></script>
</html>
index.js
import {
ref,
reactive,
effect,
} from "./node_modules/@vue/reactivity/dist/reactivity.esm-browser.js";
// vue3 最小模型
const App = {
render(context) {
effect(() => {
document.querySelector("#app").innerHTML = "";
const div = document.createElement("div");
div.innerHTML = context.count.value;
document.querySelector("#app").append(div);
});
},
setup() {
// 在这里可以方便的在控制台通过修改count来观察变化
window.count = ref(0);
return { count };
},
};
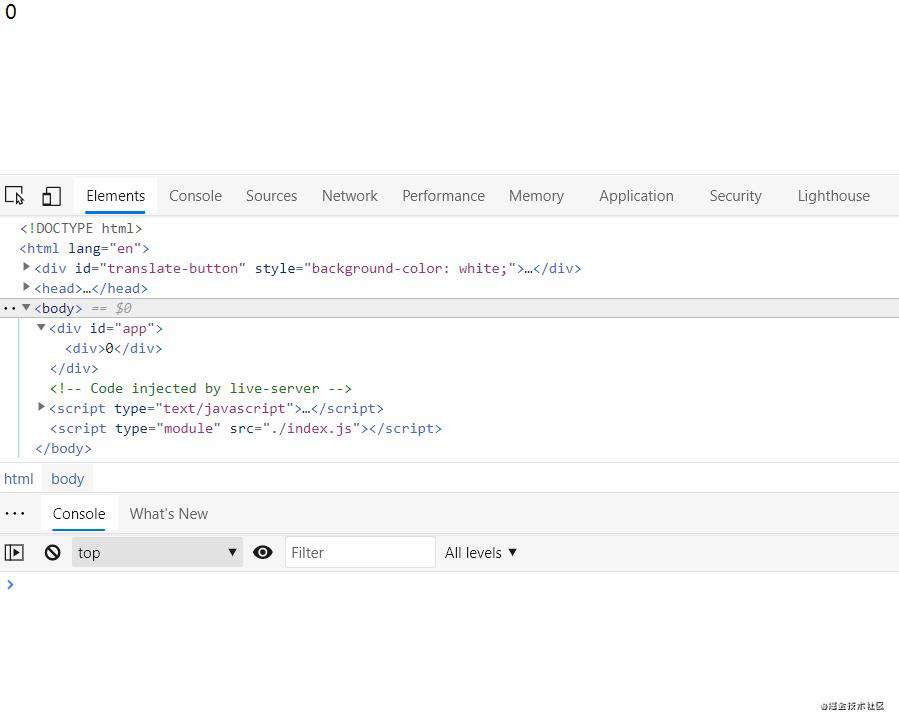
App.render(App.setup());
结果
effect的原理
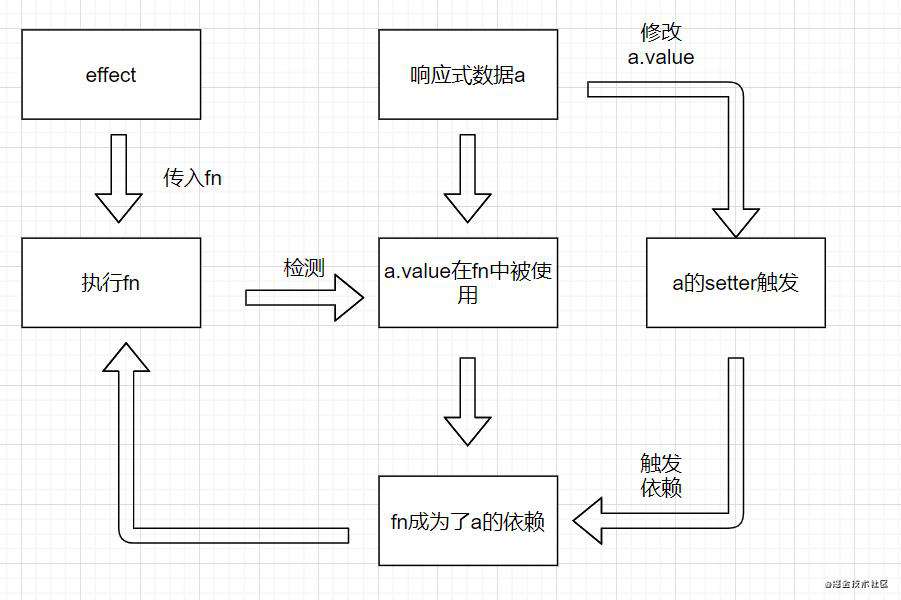
- 注意到上面的例子中,我们直接修改count.value就能直接引起dom的变化。这背后究竟是如何实现的?
- 我们都知道ref, reactive这两个都是创建响应式对象的api,而effect在这里的作用是收集依赖和触发依赖。那么effect是如何做到的?我们再看一个例子。
index.js
import {
  ref,
  reactive,
  effect,
} from "./node_modules/@vue/reactivity/dist/reactivity.esm-browser.js";

const a = ref(5);
let b;

// 1.当程序第一次到这里时,会自动执行一次fn () => {...}
effect(() => {
  b = a.value * 2;
  console.log("a", a.value, "b", b);
});

// a.value的setter触发时,触发第二次fn
a.value = 10;
输出
a 5 b 10
a 10 b 20
- 在effect中,我们传入了一个函数
fn,检测到这里有响应式数据a,那么fn被收集成为a的依赖。fn中的逻辑为a的setter触发时具体要做的事情。
自己实现响应式
如果我们自己实现响应式,那么要做的事情有什么?
- 1、实现ref, reactivity
- 2、实现effect
- 3、收集依赖
- 4、触发依赖
为了实现对依赖(depend)的管理,我们可以定义一个Dep类来进行管理。
ref与effect
//  currentEffect是全局变量,方便Dep类访问并收集依赖
let currentEffect = null;

class Dep {
  #value;

  constructor(value) {
    this.#value = value;

    //  我们要保证依赖不会重复
    this.effects = new Set();
  }

  //  getter触发收集依赖
  get value() {
    this.depend(currentEffect);
    return this.#value;
  }

  //  setter触发所有依赖
  set value(newVal) {
    this.#value = newVal;
    this.notice();
  }

  //  收集依赖,即把effect中的fn收集起来
  depend() {
    //  判断currentEffect是否有值
    currentEffect && this.effects.add(currentEffect);
  }

  // 触发依赖
  notice() {
    this.effects.forEach((effect) => {
      effect();
    });
  }
}

function watchEffect(effect) {
  currentEffect = effect;
  effect();
  currentEffect = null;
}

function ref(val) {
  return new Dep(val);
}

const dep = ref(10);

watchEffect(() => {
  //  触发getter, getter触发depend去收集依赖
  console.log(dep.value);
});

//  触发setter
dep.value = 20;
Result
10
20

至此,我们已经实现了ref和effect的功能。
reactive与effect
- 注意到ref与effect中,一个value对应一个dep
- 如果我们的响应式数据是一个对象呢,里面具有多个key,那么是不是就要需要多个dep来管理依赖?
- 如果是对应多个dep,那么我们要选择怎样的数据结构去存储?
- 如果我们要去取这个值,那么如何去取?
接下来展示一下做法,利用Map和Proxy。
//  currentEffect是全局变量,方便Dep类访问并收集依赖
let currentEffect = null;

class Dep {

  constructor() {
    //  我们要保证依赖不会重复
    this.effects = new Set();
  }


  //  收集依赖,即把effect中的fn收集起来
  depend() {
    //  判断currentEffect是否有值
    currentEffect && this.effects.add(currentEffect);
  }

  // 触发依赖
  notice() {
    this.effects.forEach((effect) => {
      effect();
    });
  }
}

function watchEffect(effect) {
  currentEffect = effect;
  effect();
  currentEffect = null;
}
在这里对Dep代码进行了部分的修改,因为在这里我们只需要Dep的收集依赖和触发依赖的功能。
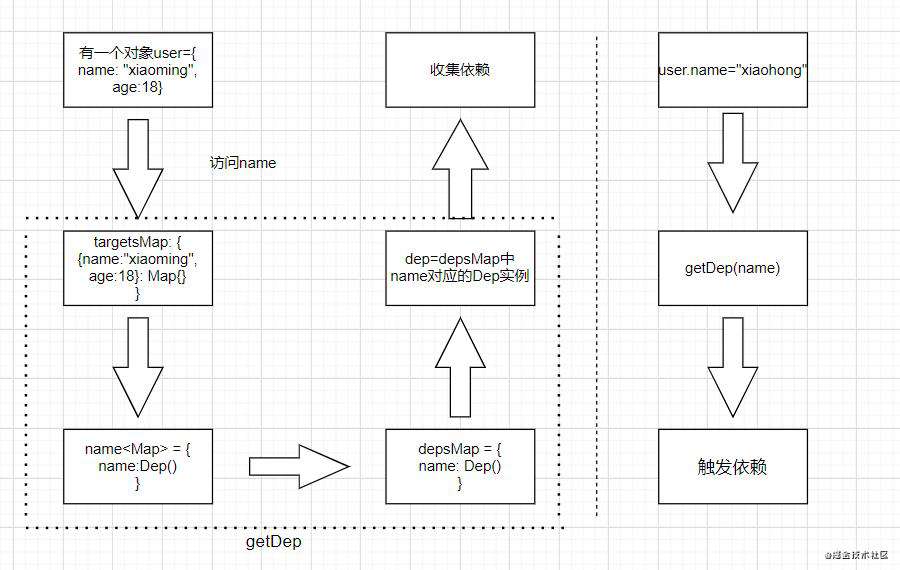
//  targetsMap储存所有的对象(即用Map包装过的dep)
//  数据结构
//  targetsMap: Map { { name: 'xiaoming', age: 18 } => Map(0) {} }
//  depsMap: Map  { 'name' => Dep { effects: Set(0) {} } }
const targetsMap = new Map();

// 辅助函数,用来获取对应的dep
function getDep(target, key) {
  let depsMap = targetsMap.get(target);
  if (!depsMap) {
    // 相当于初始化的操作
    depsMap = new Map();
    targetsMap.set(target, depsMap);
  }

//  targetsMap: Map { { name: 'xiaoming', age: 18 } => Map(0) {} }


  let dep = depsMap.get(key);
  if (!dep) {
    //  收集的依赖必须有值
    dep = new Dep();
    depsMap.set(key, dep);
  }
//  depsMap: Map  { 'name' => Dep { effects: Set(0) {} } }
  return dep;
}

function reactive(raw) {
 //  如何知道取raw中的哪个key?
 //  通过Proxy
 //  Proxy是一个包含对象或函数并允许你对其拦截的对象

  return new Proxy(raw, {
    get(target, key) {
      const dep = getDep(target, key);
      //  收集依赖
      dep.depend();

      return Reflect.get(target, key);
    },
    set(target, key, value) {
      const dep = getDep(target, key);

      // Reflect.set有返回值
      const result = Reflect.set(target, key, value);
      // notice()必须要在赋新值之后操作
      // 因为在赋新值前操作,你使用的还是旧值
      dep.notice();
      return result;
    },
  });
}
在reactive中,我们通过Proxy和Reflect进行操作,自然就不需要Dep中的getter和setter,Dep在这里的作用就是收集依赖和触发依赖。
const user = {
  name: "xiaoming",
  age: 18,
};

const userState = reactive(user);

watchEffect(() => {
  console.log(userState.name);
});

userState.name = "xiaohong";
Result:
xiaoming
xiaohong
使用自定义函数实现响应式
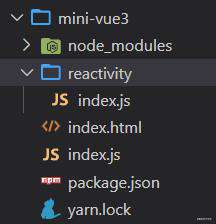
首先我们把上述这些函数封装到文件夹/reactivity/index.js中
//  currentEffect是全局变量,方便Dep类访问并收集依赖
let currentEffect = null;

class Dep {
  #value;

  constructor(value) {
    this.#value = value;

    //  我们要保证依赖不会重复
    this.effects = new Set();
  }

  //  getter触发收集依赖
  get value() {
    this.depend(currentEffect);
    return this.#value;
  }

  //  setter触发所有依赖
  set value(newVal) {
    this.#value = newVal;
    this.notice();
  }

  //  收集依赖,即把effect中的fn收集起来
  depend() {
    //  判断currentEffect是否有值
    currentEffect && this.effects.add(currentEffect);
  }

  // 触发依赖
  notice() {
    this.effects.forEach((effect) => {
      effect();
    });
  }
}

export function watchEffect(effect) {
  currentEffect = effect;
  effect();
  currentEffect = null;
}

//  targetsMap储存所有的对象
//  数据结构
//  targetsMap: Map{key: depsMap<Map> }
//  depsMap: Map {key: dep<Dep>}
const targetsMap = new Map();

function getDep(target, key) {
  let depsMap = targetsMap.get(target);
  if (!depsMap) {
    depsMap = new Map();
    targetsMap.set(target, depsMap);
  }

  let dep = depsMap.get(key);
  if (!dep) {
    dep = new Dep();
    depsMap.set(key, dep);
  }

  return dep;
}

export function reactive(raw) {
  return new Proxy(raw, {
    get(target, key) {
      const dep = getDep(target, key);
      dep.depend();

      return Reflect.get(target, key);
    },
    set(target, key, value) {
      const dep = getDep(target, key);

      const result = Reflect.set(target, key, value);
      dep.notice();
      return result;
    },
  });
}

export function ref(val) {
  return new Dep(val);
}
index.html
<!DOCTYPE html>
<html lang="en">
  <head>
    <meta charset="UTF-8" />
    <meta name="viewport" content="width=device-width, initial-scale=1.0" />
    <title>Document</title>
  </head>
  <body>
    <div id="app"></div>
  </body>
  <script type="module" src="./index.js"></script>
</html>
index.js
import { ref, reactive, watchEffect } from "./reactivity/index.js";
// vue3 最小模型
const App = {
render(context) {
watchEffect(() => {
document.querySelector("#app").innerHTML = "";
const div = document.createElement("div");
div.innerHTML =
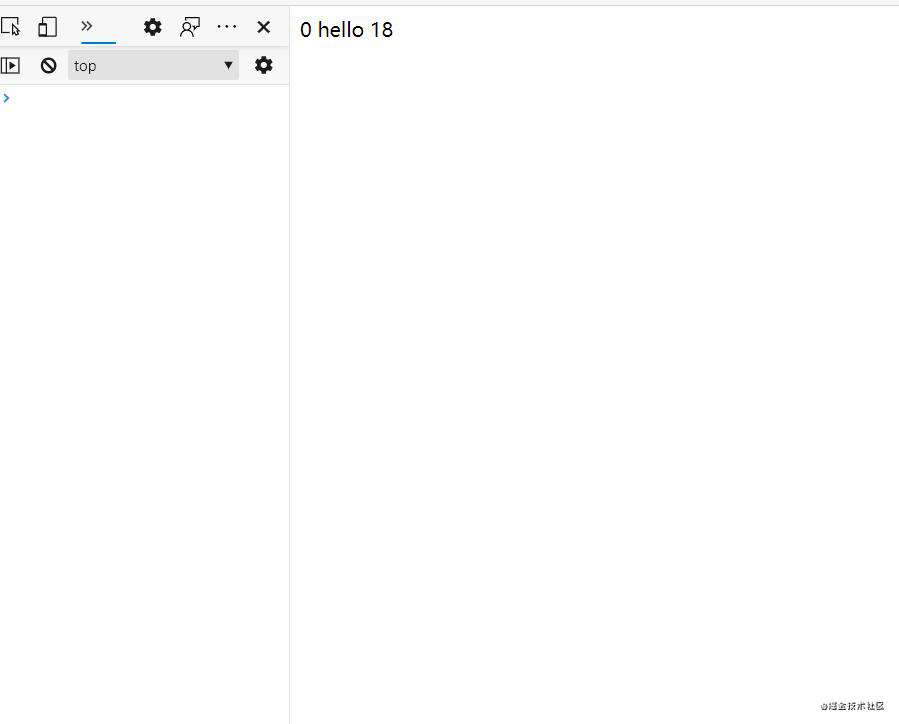
context.count.value + " " + context.user.name + " " + context.user.age;
document.querySelector("#app").append(div);
});
},
setup() {
window.count = ref(0);
window.user = reactive({ name: "hello", age: 18 });
return { count, user };
},
};
App.render(App.setup());
Result
- 到这里响应式基本完成,不过为了美观,我们需要抽离部分逻辑,实现解耦
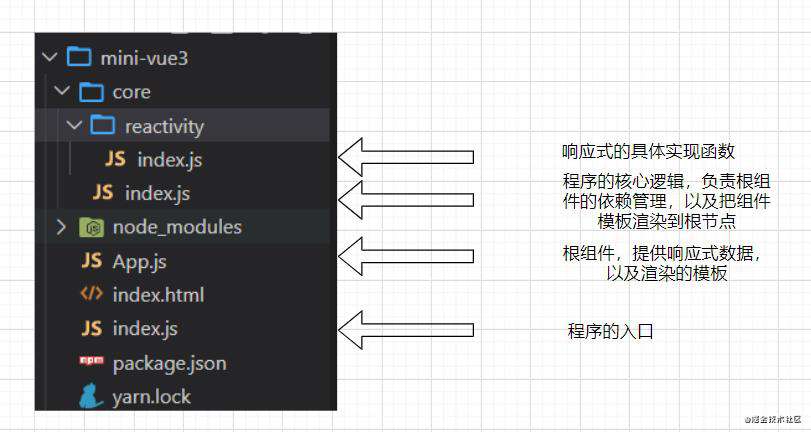
index.js
import { createApp } from "./core/index.js";
import App from "./App.js";

//  createApp -> 创建根组件
//  mount -> 挂载组件

//  与vue3的用法保持一致
createApp(App).mount(document.querySelector("#app"));
App.js
import { ref, reactive } from "./core/reactivity/index.js";
export default {
// 提供渲染模板
  render(context) {
    const div = document.createElement("div");
    div.innerHTML =
      context.count.value + " " + context.user.name + " " + context.user.age;
    return div;
  },

// 提供响应式数据
  setup() {
    window.count = ref(0);
    window.user = reactive({ name: "hello", age: 18 });

    return { count, user };
  },
};
/core/index.js
import { watchEffect } from "./reactivity/index.js";

//  一开始我们的用法是App.render(App.setup())
//  简单点说就是:
//  setup()获取响应式数据 -> 丢给处理函数 -> watchEffect中渲染/更新视图

//  我们封装之后就变成了
//  createApp(App) -> mount -> setup获取App的响应式数据 ->
//  watchEffect -> 执行render(渲染/更新视图)
export function createApp(rootComponent) {
  return {
    //  rootContainer 根容器
    mount(rootContainer) {
      //  setupResult获取响应式数据
      const setupResult = rootComponent.setup();

      watchEffect(() => {
        //  更新视图
        const element = rootComponent.render(setupResult);
        rootContainer.innerHTML = "";
        rootContainer.append(element);
      });
    },
  };
}
vdom
- 我们都vue和react都是基于virtual dom进行的。所以我们需要实现一个创建vdom的函数
h - 以及将vdom渲染成真实dom的函数
mountElement

/core/h.js
// 作用是提供我们创建vdom所需要信息
export function h(type, props, children) {
  return {
    type,
    props,
    children,
  };
}
/core/renderer.js -- 将虚拟节点vdom转成真实的dom
//  虚拟节点转换为真实节点
//  vnode: {type, props, children}

//  children支持两种写法string与arrray
//  h("div", null, [h("div", null, "hello")])
//  h("div", null, "hi")
export function mountElement(vnode, container) {
  const { type, props, children } = vnode;

  const el = createElement(type);

// 有属性就给他挂上
  if (props) {
    for (const key in props) {
      const val = props[key];
      patchProps(el, key, null, val);
    }
  }

// 如果子节点只是文本的话,就直接添加到尾部
  if (typeof children == "string" || typeof children == "number") {
    const text = document.createTextNode(children);
    el.append(text);
  } else if (Array.isArray(children)) {
    //  递归, 将其子节点挂在父节点上
    children.forEach((node) => {
      mountElement(node, el);
    });
  }

  container.append(el);
}

//  创建dom元素的类型
function createElement(type) {
  return document.createElement(type);
}

//  给元素添加属性
function patchProps(el, key, preValue, nextValue) {
  el.setAttribute(key, nextValue);
}
/core/index.js
import { watchEffect } from "./reactivity/index.js";
import { mountElement } from "./renderer.js";

export function createApp(rootComponent) {
  return {
    //  rootContainer 根容器
    mount(rootContainer) {
      //  setupResult获取响应式数据
      const setupResult = rootComponent.setup();

      watchEffect(() => {
        // 获取render里关于虚拟节点的详细信息
        const subTree = rootComponent.render(setupResult);
        rootContainer.innerHTML = "";
        // 把subTree里虚拟节点的信息转换成真实的dom
        mountElement(subTree, rootContainer);
      });
    },
  };
}
app.js
import { ref, reactive } from "./core/reactivity/index.js";
import { h } from "./core/h.js";
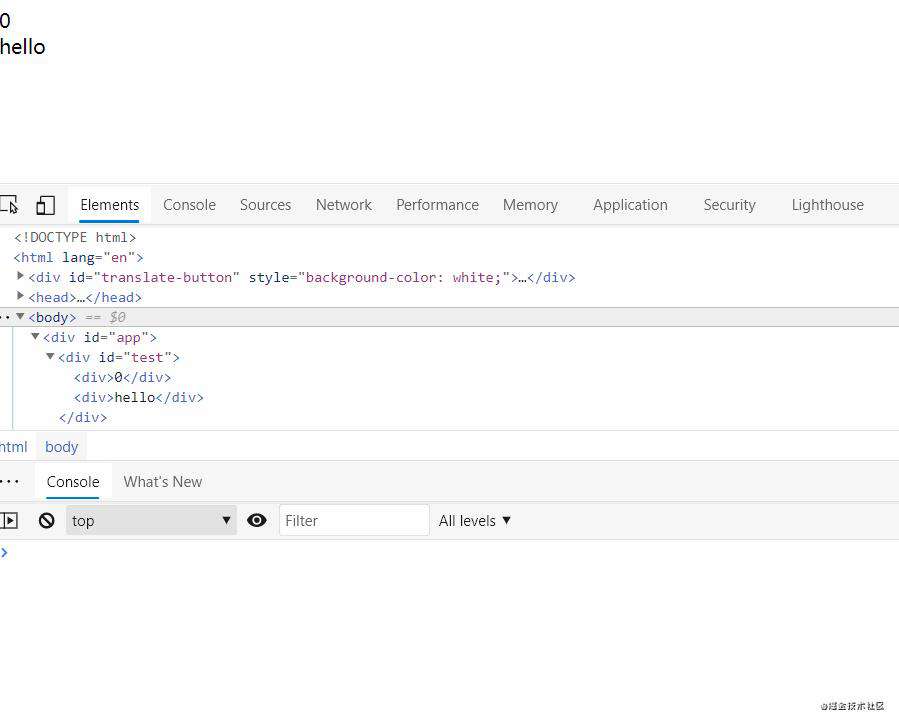
export default {
render(context) {
return h("div", { id: "test" }, [
h("div", null, context.count.value),
h("div", null, context.user.name),
]);
},
setup() {
window.count = ref(0);
window.user = reactive({ name: "hello", age: 18 });
return { count, user };
},
};
Result:
diff
- 在没实现vdom之前,我们都是直接操作真实节点直接让innerHTML清空,这种做法太过暴力。而且无法判断节点是否更改或删除。
- 我们实现vdom之后,就可以在
renderer.js里的diff函数中进行判断。 diff就是可以找出哪些节点改变,哪些没有改变。- 在这次中实现的diff算法很简陋,大概就从type, props, children这几个方面去考虑。
/core/renderer.js
//  虚拟节点转换为真实节点
//  vnode: {type, props, children}

//  children支持两种写法string与arrray
//  h("div", null, [h("div", null, "hello")])
//  h("div", null, "hi")
export function mountElement(vnode, container) {
  const { type, props, children } = vnode;

  const el = createElement(type);

  vnode.el = el;

  if (props) {
    for (const key in props) {
      const val = props[key];
      patchProps(el, key, null, val);
    }
  }

  if (typeof children == "string" || typeof children == "number") {
    const text = document.createTextNode(children);
    el.append(text);
  } else if (Array.isArray(children)) {
    //  递归, 将其子节点挂在父节点上
    children.forEach((node) => {
      mountElement(node, el);
    });
  }

  container.append(el);
}

//  创建dom元素的类型
function createElement(type) {
  return document.createElement(type);
}

//  给元素添加属性
function patchProps(el, key, preValue, nextValue) {
  if (nextValue) {
    el.setAttribute(key, nextValue);
  } else {
    //  删除属性
    el.removeAttribute(key);
  }
}

export function diff(prev, curr) {
  // 对比type, 不一样的话可以全部换掉
  if (curr.type != prev.type) {
    prev.el.replaceWith(createElement(curr.type));
  } else {
    // props改变
    // 主要是三种情况
    // 1. 值改变 prev {id: "old"} curr: {id:"new"}
    // 2. curr有新属性 prev {id: "old"} curr: {id:"old", test:"123"}
    // 3. curr少了属性 prev: {id:"old", test:"123"} curr: {test: "123"}

    const oldProps = prev.props || {};
    const newProps = curr.props || {};

    const el = (curr.el = prev.el);

    //  处理新的props
    Object.keys(newProps).forEach((key) => {
      //  情况一: 值更新
      //  情况二: 添加新值, 因为旧值中没有肯定是undefined
      if (newProps[key] !== oldProps[key]) {
        patchProps(el, key, oldProps[key], newProps[key]);
      }
    });

    //  处理旧的props
    //  情况三: 旧的有, 就需要删除
    Object.keys(oldProps).forEach((key) => {
      if (!newProps[key]) {
        patchProps(el, key, oldProps[key], null);
      }
    });

    //  处理children
    //  children -> string | array
    //  newChildren -> string | array
    //  两两组合, 就会出现四种情况

    const newChildren = curr.children || [];
    const oldChildren = prev.children || [];

    if (typeof newChildren == "string" || typeof newChildren == "number") {
      if (typeof oldChildren == "string" || typeof oldChildren == "number") {
        //  两个都是string, 对比一下是否不同再替换

        if (newChildren !== oldChildren) {
          el.textContent = newChildren;
        }
      } else if (Array.isArray(oldChildren)) {
        //  新children是string, 旧的string是节点数组, 直接替换即可
        el.textContent = newChildren;
      }
    } else if (Array.isArray(newChildren)) {
      if (typeof oldChildren == "string" || typeof oldChildren == "number") {
        //  有新的节点, 这时候要节点插入到旧节点的位置
        el.innerHTML = ``;
        newChildren.forEach((node) => {
          mountElement(node, el);
        });
      } else if (Array.isArray(oldChildren)) {
        //  考虑三种情况
        //  old的children与new的一样多
        //  old的比new的多
        //  old的比new的少

        //  暴力算法,先算出公共长度,公共长度内的直接对比替换
        //  多出来的直接删除
        //  少的就添加

        const commonLength = Math.min(newChildren.length, oldChildren.length);
        for (let i = 0; i < commonLength; i++) {
          const oldVnode = oldChildren[i];
          const newVnode = newChildren[i];

          diff(oldVnode, newVnode);
        }

        if (oldChildren.length > newChildren.length) {
          for (let i = commonLength; i < oldChildren.length; i++) {
            const vnode = oldChildren[i];
            el.removeChild(vnode.el);
          }
        }

        if (newChildren.length > oldChildren.length) {
          for (let i = commonLength; i < newChildren.length; i++) {
            const vnode = newChildren[i];
            mountElement(vnode, el);
          }
        }
      }
    }
  }
}
/core/index.js
import { watchEffect } from "./reactivity/index.js";
import { mountElement, diff } from "./renderer.js";
//  一开始我们的用法是App.render(App.setup())
//  简单点说就是:
//  setup()获取响应式数据 -> 丢给render -> watchEffect-> 更新视图

//  我们封装之后就变成了
//  App -> createApp(App) -> mount -> setup获取响应式数据 ->
//  watchEffect -> 执行render(更新视图)
export function createApp(rootComponent) {
  return {
    //  rootContainer 根容器
    mount(rootContainer) {
      //  setupResult获取响应式数据
      const setupResult = rootComponent.setup();

      //  是否初始化
      let isMounted = false;

      let prevSubTree = null;

      watchEffect(() => {
        if (!isMounted) {
          isMounted = true;
          const subTree = rootComponent.render(setupResult);
          mountElement(subTree, rootContainer);
          prevSubTree = subTree;
        } else {
          //  初始化过了, 在这里实现diff
          const subTree = rootComponent.render(setupResult);
          diff(prevSubTree, subTree);
          prevSubTree = subTree;
        }
      });
    },
  };
}
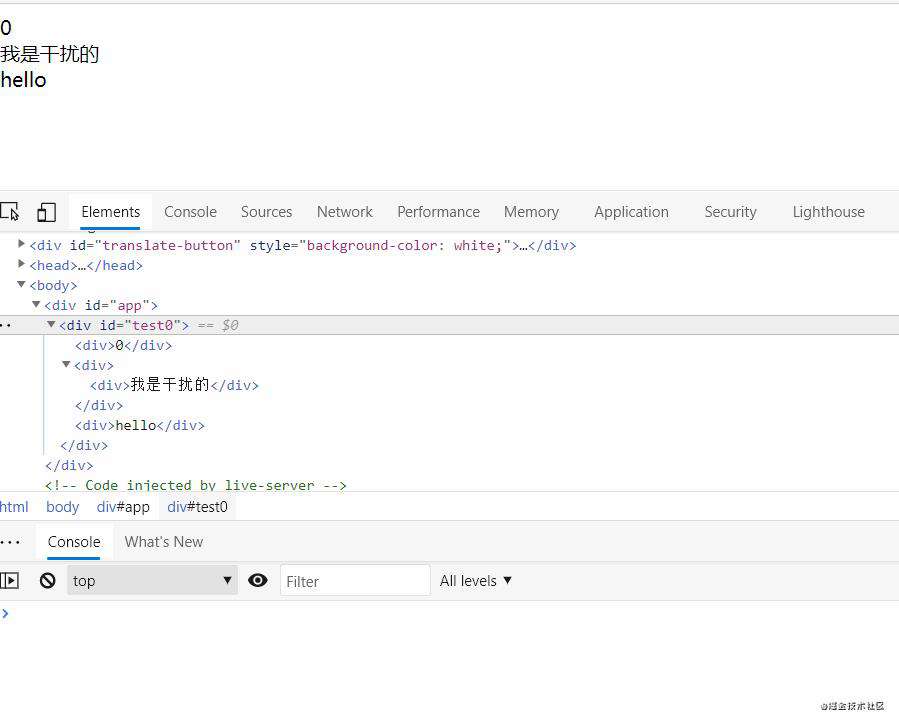
app.js
import { ref, reactive } from "./core/reactivity/index.js";
import { h } from "./core/h.js";
export default {
  render(context) {
    // const div = document.createElement("div");
    // div.innerHTML =
    //   context.count.value + " " + context.user.name + " " + context.user.age;

    return h("div", { id: "test" + context.count.value }, [
      h("div", null, context.count.value),
      h("div", null, [h("div", null, "我是干扰的")]),
      h("div", null, context.user.name),
    ]);
  },

  setup() {
    window.count = ref(0);
    window.user = reactive({ name: "hello", age: 18 });

    return { count, user };
  },
};
result:
常见问题FAQ
- 免费下载或者VIP会员专享资源能否直接商用?
- 本站所有资源版权均属于原作者所有,这里所提供资源均只能用于参考学习用,请勿直接商用。若由于商用引起版权纠纷,一切责任均由使用者承担。更多说明请参考 VIP介绍。
- 提示下载完但解压或打开不了?
- 找不到素材资源介绍文章里的示例图片?
- 模板不会安装或需要功能定制以及二次开发?


发表评论
还没有评论,快来抢沙发吧!